RSS2.0

Wednesday, September 14, 2011

Windows 8 - New Metro UI (User Interface) - Will it affect Linux?

Microsoft have been busy showing off "Windows 8" today – and, to their credit, it’s looking and behaving pretty different to their previous releases.

The video below, courtesy of anandtech, demonstrates many of the changes Windows 8 is sporting, not least of which is a whole new almost "Tablet Like" user interface or UI:


What does Windows 8 mean for Linux?

That’s the question I asked myself as I sat digesting the live-blog morsels dripping out from attendees at the ‘unveiling’. The simple answer is ‘nothing’: Windows 8 is unlikely to sway hardened Linux users; dual-booters will continue to dual-boot; and the linux-curious will remain curious.
But on a deeper level Windows 8 is significant: not only is it the first time Microsoft have deviated from the safety of the “Windows 95″ desktop metaphor, but it’s also bringing a bunch of smartphone and tablet concepts, features and technologies to the desktop experience. That’s not an easy thing to do, and from reviews and previews so far it seems Microsoft have outdone themselves in melding the the two successfully.
Rather than list every nuance demoed by Microsoft today i’m going to highlight a few features in Windows 8 that I think – emphasis on the I here folks – will provide some competitive flair for Linux developers to work against.

Metro UI

Ubuntu, GNOME and others have all been busy having their own interface overhauls recently, so the introduction of a new interface for Windows is following the trend of questioning the traditional “desktop metaphor” as it currently exists. They’ve seemingly opted to veer into a different direction than Unity or GNOME 3, and credit for doing something different.
I suspect that the sleek animated transitions and application feedback in the Metro interface so far will cause Linux developers to think a bit more about “polish” and presentation.

Multiplatform

Windows 8 will be ARM compatible, theoretically meaning that the competition for ARM-toting Linux efforts like Linaro is heating up. But Microsoft only demoed Windows 8 on an x86 Intel processor at the BUILD event (which was said to be very hot, very noisy and very sluggish in turning back on).
Microsoft insist that ARM support is being properly attended to, and that future announcements/demos of Windows 8 on ARM will be made.

The “one platform” approach

Windows 8 retains the “old style” Windows desktop as, essentially, another app in the Metro interface. The result is a single OS that is both tailored to tablets, but also to mouse-bound desktop users.
On a Linux related note, Ubuntu 11.04 saw Canonical fold the various netbook spins of Ubuntu into the main release. Similarly, although Canonical insist that Ubuntu is not heading to the tablet sector any time soon there’s no denying that various developments to the Ubuntu interface – particularly with regard to Unity and uTouch – mean Ubuntu already functions well on a tablet, although is by no means ideal.
Windows 8 is being sensible in this ‘unification’ approach. It’s less confusing for consumers, and easier for developers. That said, I still somewhat expect Microsoft to stuff it up by announcing an ensemble of “Tablet Edition Premium” and “Desktop Metro Home Professional” varieties.

Doesn’t close apps

Oh yes – Windows 8 appears, in demos so far, to take the OS X/Smartphone approach to application management and not quitting apps when closing a document/app window.
The result is almost instant launch times when those apps are opened again. Given the memory-hogging nature of many apps, it’ll be interesting to see how memory management works in Windows 8.
Linux developers have recently begun to question loading times of linux applications – but is there a case to be made for introducing a “document-orientated” approach on Ubuntu?

Minimal RAM Requirements

Microsoft “claim” that the ‘base system’ of Windows 8 can be run on as little as 256mB of RAM. Impressive if true, as Ubuntu 11.04 would struggle to perform adequately on such a meagre amount although official “light weight spins” such as Lubuntu are able to thrive on such resources.

Fast Boot Times

Microsoft claim that Windows 8 can boot in as little as 8 seconds. This is helped by the switch to a new filesystem – called ‘Protogon’ – and changes to the way the Windows kernel (the main component of an operating system) behaves during shutdown.
A bold claim that will be interesting to see tested on a typical user hardware rather than high-performance  SSD.
Those with long memories may remember that Ubuntu 10.04 promised  a 10 second boot, which is didn’t quite manage to achieve.

What do you make of Windows 8? Are there features in it that could sway you from Ubuntu?  Feel free to openly express your opinions, thoughts, etc. as replies to this post using the form below.  Please keep the discussion civilized (if possible lol)...

I say that it's still Widows and will still be inferior to any Unix Based OS including Mac OS and Liinux.  Period...  There WILL be a day when Linux rules the Home/Business Desktop Computer and Microsoft will be nothing more than a team of Linux Developers working on Linux software and drivers LOL...

Sunday, September 4, 2011

XFCE – Tweaks, Tips and Tricks

Taken from XFCE sources (xfce4-session-4.4.0.t...
XFCE
First of all, I probably made XFCE use little more processes and made it little heavier than it usually is. But if you love the layout and the applications, you might consider using it anyway. And some users don’t like Gnome 3 at all. So this post might help you consider trying XFCE again.

Use normal sound icon in system tray

Lets start with adding a “normal” sound icon in system tray area. That has increase/decrease sound when leftclick on it. And little more settings to change sound in your system.
sudo conary update gnome-media
It wont install any other dependencies of Gnome, so you wont poison your XFCE at all.

Use Notify-osd

Now we might want to make it look little nicer. so let’s change notify package. First we need to uninstall current one, before we install notify-osd.
Uninstall default one in XFCE:
sudo conary erase xfce4-notifyd
Install notify-osd instead:
sudo conary update notify-osd
And it’s done, should now see notify-osd when increasing sound in your laptop (or similar). Need to restart pidgin though, to see changes there.

Udev-notify for hardware devices

To make new hardware to show notifies alot nicer, you need to install udev-notify.
Open terminal and write
sudo conary update udev-notify

Read more about udev-notify here.

Recent Documents

You also missing recent documents? Then you need to add “Places” in your panel to be able to see recent documents. Also make sure you have xfce4-places-plugin. It’s in Foresight XFCE as default.

And today, this is how my desktop look like:


Remember that all packages that I write about, always is in fl:2-devel label. To see your current label, open terminal and write:
conary q group-gnome-dist --labels
Read more at: Development page

Enhanced by Zemanta

Friday, July 29, 2011

Practical Guide to Linux Commands, Editors, and Shell Programming, A (2nd Edition)


Practical Guide to Linux Commands, Editors, and Shell Programming, A (2nd Edition)


This is an excellent book that I highly recommend for anyone who want's to learn/keep up with the latest and greatest Linux Commands, Editiors, and Shell Programming Knowledge!

Such a great book it's actually worth buying if you are serious about learning Linux Commands, Editors, and Shell Programming!

Highly Recommended!

Also, here are some other great Linux books that I highly recommend purchasing while they're still in stock:


Saturday, May 7, 2011

How To Install Google Android On Windows, Mac or Linux PC

How To Install Google Android On Windows, Mac or Linux PC:

If you want to try out Google Android before buying an Android based mobile phone then you have come to the right place. Google provides an Android emulator along with the Android SDK.
If you are a developer you can test the apps you write using this emulator or if you just want to test drive an Android phone, you can do that too.
To get the Android Emulator up and running:
>First, Download Java from here and install it.
>Now you have to download the Android SDK from here. While downloading for windows select the Compressed .zip file, not the “recommended” .exe file.
>Once that download is done, extract the contents of the .zip file. After the extraction, open SDK Setup.exe.
>Now the SDK will get a list of packages available from Google. If there is an error go to Settings and check “Force https://…”.
choose packages to install android How To Install Google Android On Windows, Mac or Linux PC
>Now you will be shown a list of platforms. Unless you want to try all the versions of Android, select only the versions you want to try as each Platform is about 50-75 MB in size. For the others select them then click Reject.
>Now you will be able to see an “Installing Archives” dialog box. Once the download is over click on “Close”.
>Next we set up the Virtual phone. Click on “Virtual devices”, then “New…”.
Creating AVD How To Install Google Android On Windows, Mac or Linux PC
>Now just select the Skin, SD Card Size& Android Version you want. Now Give a name to your Virtual Device and then click “Create AVD”. When you click this there can be a small time lag till a message comes that the Virtual Device has been created.
>Now select your virtual device from “Virtual devices” and select “Start…”.
Emulator 560x378 How To Install Google Android On Windows, Mac or Linux PC
>Now a screen with “ANDROID_” will comes with the underscore blinking.
Home How To Install Google Android On Windows, Mac or Linux PC
>After which the Android Start Up screen will become visible and then you will reach your home-screen. Thats it. Now you can use your Android Virtual Phone.
Done How To Install Google Android On Windows, Mac or Linux PC
With the Emulator you can do many things that you can do with a real Android such as:

  • Browse the Internet just as in an Android Mobile.
  • Check out the Menus, Widgets, Wallpapers, Settings etc…
  • Install free Apps off the Internet.
Sadly with this emulator you will not be able to use the Android Market Place to download Apps.

Search Amazon.com CellPhones for htc

Wednesday, May 4, 2011

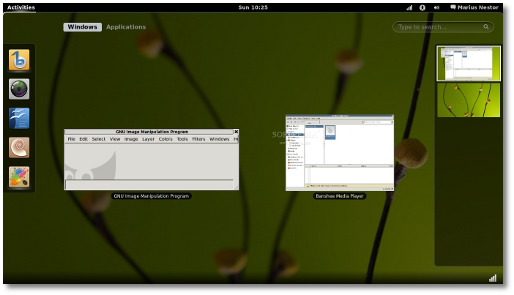
Install GNOME 3 on Ubuntu 11.04

The following tutorial will teach you guys how to install the highly anticipated

GNOME 3

desktop environment on the Ubuntu 11.04 (Natty Narwhal) OS.


GNOME 3 is the next evolution of the GNOME desktop environment, and it has been released on April 6th, 2011, on mirrors worldwide. GNOME 3 is a light desktop environment used in many popular Linux distributions, such as Ubuntu, Mandriva, PCLinuxOS, etc.

We've tested the tutorial on the beta version of the upcoming Ubuntu 11.04 (Natty Narwhal) distribution. To install

    GNOME
3 on your system follow the next step-by-step (with screenshots) tutorial.

WARNING: Attention! If you follow this toturial, you'll break your Unity session. There is no downgrading method for now. You've been warned!

Step 1Add the GNOME 3 repository

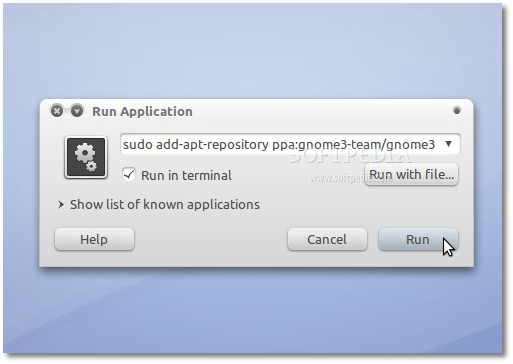
Hit the ALT+F2 key combination on your keyboard, check the "Run in terminal" option and paste the following command in the "Run Application" dialog:

sudo add-apt-repository ppa:gnome3-team/gnome3

Review image

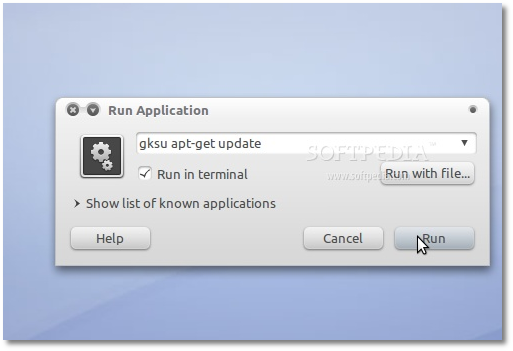
Enter your password when asked and hit the OK button. A terminal window will appear for a few seconds, and it will automatically close. Hit the ALT+F2 key combination again, check the "Run in terminal" option and paste the following command in the "Run Application" dialog:

gksu apt-get update

Review image

Enter your password when asked and hit the OK button. A terminal window will appear for a few seconds, and it will automatically close.

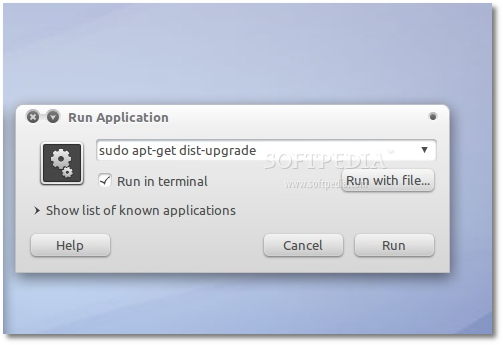
Hit the ALT+F2 key combination again, check the "Run in terminal" option and paste the following command in the "Run Application" dialog:

sudo apt-get dist-upgrade

Review image

A terminal window will appear. Enter your password and hit Enter. When you will be asked if you want to upgrade your packages, type Y and hit Enter. The terminal window will automatically close when the installation is over.

Step 2 - Install GNOME 3

Hit the ALT+F2 key combination again, check the "Run in terminal" option and paste the following command in the "Run Application" dialog:

sudo apt-get install gnome-shell

Enter your password and hit Enter. When you will be asked if you want to install gnome-shell, type Y and hit Enter. The terminal window will automatically close when the installation is over.

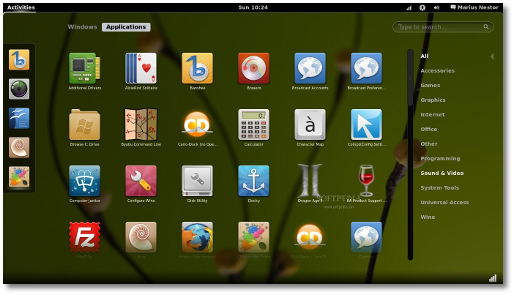
That's it! GNOME 3 is now completely installed in your Ubuntu machine. All you have to do now is to reboot your system and choose Ubuntu GNOME Shell Desktop at the login screen.

Enjoy your new GNOME 3 desktop environment!

Review image

Review image

In time, your GNOME 3 installation will automatically update to newer versions, so make sure you update your system regularly.

If you have problems with the tutorial, do not hesitate to comment below!